Getting started with Plug in Elixir
In the Elixir world, Plug is the specification that enables different frameworks to talk to different web servers in the Erlang VM.
If you are familiar with Ruby, Plug tries to solve the same problem that Rack does, just with a different approach.
Understanding the basics of how Plug works will make it easier to get up to speed with Phoenix, and probably any other web framework
that is created for Elixir.
The role of a plug
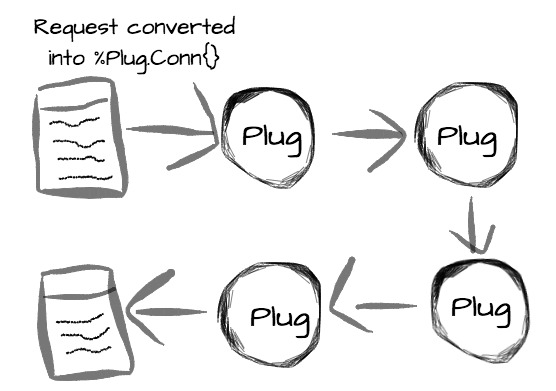
You can think of a Plug as a piece of code that receives a data structure, does some sort of transformation, and returns
this same data structure, slightly modified. This data structure that a Plug receives and returns is usually called connection,
and represents everything that there is to know about a request.
As plugs always receive and return a connection, they can be easily composable, forming what is called a Plug pipeline. Actually,
that is what usually happens. We receive a request, then each plug transforms this request a little bit and pass the result to the next plug, until we
get a response.
This connection that our plugs will be dealing with all the time is a simple Elixir struct, called %Plug.Conn{}, which is very well documented.
The two types of Plugs
There are two types of Plugs we can have: Function plugs and module plugs.
A function plug is any function that receives a connection (that is a %Plug.Conn{}) and a set of options, and returns a connection. Here is a simple example of a valid Plug:
def my_plug(conn, opts) do
  conn
end
A module plug is any module that implements two functions: init/1 and call/2, like this:
module MyPlug do
  def init(opts) do
    opts
  end

  def call(conn, opts) do
    conn
  end
end
One interesting characteristic of module plugs is that init/1 is executed in compile time, while call/2 happens at run time.
The value returned by init/1 will be passed to call/2, making init/1 the perfect place to do any heavy lifting and let
call/2 run as fast as possible at run time.
A simple example
To try to make things more concrete, let’s create a simple application that uses a plug to handle an http request.
First, create a project with mix:
$ mix new learning_plug
Then cd into the project’s directory and edit mix.exs adding Plug and Cowboy (the web server) as dependencies:
defp deps do
  [{:plug, "~> 1.0"},
   {:cowboy, "~> 1.0"}]
end
Now run mix deps.get to install these dependencies and we should be good to start.
Our first plug will simply return a “Hello, World!” text:
defmodule LearningPlug do
  # The Plug.Conn module gives us the main functions
  # we will use to work with our connection, which is
  # a %Plug.Conn{} struct, also defined in this module.
  import Plug.Conn

  def init(opts) do
    # Here we just add a new entry in the opts map, that we can use
    # in the call/2 function
    Map.put(opts, :my_option, "Hello")
  end

  def call(conn, opts) do
    # And we send a response back, with a status code and a body
    send_resp(conn, 200, "#{opts[:my_option]}, World!")
  end
end
To use this plug, open iex -S mix and run:
Plug.Adapters.Cowboy.http(LearningPlug, %{})
{:ok, #PID<0.150.0>}
Here we use the Cowboy adapter, and tell it to use our plug. We also need to pass an options value that will
be used by init/1.
This should have started a Cowboy web server on port 4000, so if you open http://localhost:4000 you should see the “Hello, World!” message.
This was simple enough. Let’s just try to make this plug a bit smarter and return a response based on the URL we hit,
so if we access http://localhost:4000/Name, we should see “Hello, Name”.
I said that a connetion represents everything there is to know about a request, and that includes the request path. We can just pattern match
on this request path to create the response we want. Let’s change the call/2 function to be like this:
def call(%Plug.Conn{request_path: "/" <> name} = conn, opts) do
  send_resp(conn, 200, "Hello, #{name}")
end
And that’s it. We pattern match the connection to extract just the information we want, the name, and then send the response we want back to
the web server.
Pipelines, because one ant is no ant
Plug gets more interesting when you start composing multiple plugs together, each one doing a small task and handing a modified connection to the next.
Phoenix, the web framework, uses these pipelines in a clever way. By default, if we are handling a normal browser request, we have a pipeline like this:
pipeline :browser do
  plug :accepts, ["html"]
  plug :fetch_session
  plug :fetch_flash
  plug :protect_from_forgery
  plug :put_secure_browser_headers
end
In case we are handling an api request, we don’t need most of these things, so we can have a simpler pipeline just for our api:
pipeline :api do
  plug :accepts, ["json"]
end
Now, this pipeline is a Phoenix abstraction, but Plug gives us an easy way to build our own pipelines: Plug.Builder.
Here’s an example of how it works:
defmodule MyPipeline do
  # We use Plug.Builder to have access to the plug/2 macro.
  # This macro can receive a function or a module plug and an
  # optional parameter that will be passed unchanged to the
  # given plug.
  use Plug.Builder

  plug Plug.Logger
  plug :extract_name
  plug :greet, %{my_option: "Hello"}

  def extract_name(%Plug.Conn{request_path: "/" <> name} = conn, opts) do
    assign(conn, :name, name)
  end

  def greet(conn, opts) do
    conn
    |> send_resp(200, "#{opts[:my_option]}, #{conn.assigns.name}")
  end
end
Here we combined three plugs, Plug.Logger, extract_name and greet.
The extract_name uses assign/3 to assign a value to a key in this connection. assign/3 returns a modified connection, that
is then handed to the greet plug, that basically reads this assigned value to create the response we want.
Plug.Logger is shipped with Plug and, as you probably guessed, is used to log our http requests. A bunch of useful plugs like this
are available out of the box, you can find the list and descriptions in the docs (“Available Plugs” section).
Using this pipeline is as simple as using a single plug:
Plug.Adapters.Cowboy.http MyPipeline, %{}
One important thing to keep in mind is that the plugs will always be executed in the order they are defined in the pipeline.
Another interesting thing is that these pipelines created with Plug.Builder are also plugs, so we can have pipelines that are
composed by other pipelines.
And to sum up
The main idea is that we have our request represented as a %Plug.Conn{}, and this struct is passed from function to function, being
slightly modified in each step, until we have a response that can be sent back. Plug is a specification that defines how this should work
and creates an abstractions so multiple frameworks can talk to multiple web server, as long as they are respecting the specification.
It also ships with these convenience modules that make it easier to do a lot of things that are common to most applications, like creating pipelines, simple routers, dealing with cookies, headers, etc.
In the end of the day, it’s just that simple functional programming idea of passing data through functions until we get the result we want, and in this case the data happens to be an http request.
Interested in learning Kubernetes?
I just published a new book called Kubernetes in Practice, you can use the discount code blog to get 10% off.